Capture Settings are set-up separately for each capture channel. Once these settings have been specified, OK or Apply should be clicked. This tab specifies Database settings.
Database Support and Requirements
ComCap allows captured data to be saved in a database table. Currently only databases supported by Microsoft Data Access Components (MDAC or ADO) may be used, with testing using Microsoft SQL Servers 2000, 2005 and 2008, Sun MySQL 5.1 and IBM DB2 v9.7. In theory Access (Jet) could be used, but since SQL Server 2005 and 2008 Express are free (database limited to 4 gigs), there seems little point. MDAC may be used with any database with an ODBC or OLE DB Provider driver, however not all drivers provide the same level of support and may not be usable with ComCap. Please check the help page for the specific databases for recommended drivers and data link set-up:
For Windows 2000, MDAC 2.8 SP1 (free download from Microsoft MDAC Downloads) should be installed before attempting to configure database support in ComCap. Windows XP SP2, Windows 2003, Vista, 2008 and 7 include MDAC as part of the core operating system.
ComCap also includes Sample Database SQL scripts to create empty tables and stored procedures, to illustrate database capture.
Background Service
If ComCap is configured to capture to a database using the Background Service, the service must be set-up with a local PC account name and password, see Capture Logging.
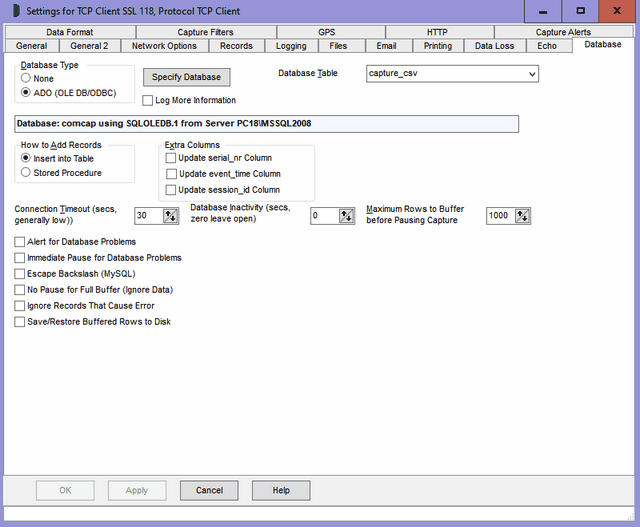
Database Type
This option selects the technology that ComCap uses for database access, currently only ADO using Microsoft Data Access Components (MDAC) with OLE DB or ODBC drivers. Future ComCap releases may support more efficient database access technology.
Specify Database
The Specify Database Button displays the MDAC Data Link Properties dialog. From there, first select the OLE DB provider, usually SQL Server but perhaps ODBC or Jet. On the Connection tab, select or enter a SQL server name (it may be available in the drop down box, but may need a UNC name entered), then specify authentication to logon to the database, and finally the actual database to be used. Click Test Connection to make sure SQL is working, then OK. ComCap will then open the database and the details will be displayed to confirm it’s all working OK. More than one channel may capture data to the same database table, but each channel will use a separate link, to allow saving in parallel. More details for specific databases may be found at:
Note the database and optionally stored procedure to add records must already exist before ComCap can be configured.
How to Add Records
This option determines how records will be added to the database:
Insert into Table |
A Database Table selection field will appear, with a drop down box listing all the tables in the database, from which one should be selected. ComCap will use the SQL INSERT statement to add records directly into this table, using the columns specified in the Data Format. |
Stored Procedure |
A Stored Procedure selection field will appear, with a drop down box listing all the stored procedure in the database, from which one the one created for this channel should be selected. Note that not all databases support stored procedures. |
Extra Columns
ComCap supports three special database columns, serial_nr, event_time and session_id which may be completed automatically by ComCap . This option has three tick boxes to specify the database table has any of these columns as columns. In the case of stored procedure, these columns must be the first parameters, in that order. If these extra columns are used, don't attempt to put data into them using the Data Format. More details about these extra columns may be found at Sample Database SQL scripts.
Connection Timeout
This option specifies the database connection timeout in seconds, defaulting to 30 seconds, with an minimum of 10 seconds. Generally keep a low timeout since this also restricts the frequency when repeat attempts may be made to reconnect to the database. The maximum timeout is 120 seconds.
Database Inactivity
This option allows the database connection to be closed after an idle period in seconds with no new data captured, up to a maximum of 600 seconds. The database will be automatically re-opened when new data arrives. Setting zero seconds will leave the database connection open continually, which is normally perfectly OK.
Maximum Rows to Buffer Before Pausing Capture
When a data row can not be written to the database immediately, it is automatically buffered so it can be written later. This can happen because capture is happening faster than data can be written to the database, which may be limited to only 50 to 150 rows maximum per second, or due to other database problems or errors. The maximum number of rows that may be buffered can be configured from 50 to 99,999. When this maximum number of rows is exceeded, capture may be automatically paused until the buffered rows are written successfully, or subsequent rows are ignored (but still written to the capture log file) depending on the option 'No Pause for Full Buffer (Ignore Data)' see below. Note that rows are buffered in memory, so this must be sufficient for the data expected to be buffered. If ComCap is exited before the buffered rows are written, the rows are lost, unless 'Save/Restore Buffered Rows to Disk' is enabled, see below. Another way to reduce the load on the database is 'Ignore Too Many Lines' option on the Records tab, which allows a gap in fractions of a second to be specified between lines, which may be useful to reduce the amount of data captured from devices sending continuous streams, such as GPS locators or environmental sensors.
Alert for Database Problems
Ticking this option will cause an alert to be triggered for database problems, specifically if the database can not be opened.
Immediate Pause for Database Problems
Temporary database problems are almost inevitable, perhaps due to communication problems or the database server being rebooted, so ComCap has various means of coping with them. ComCap is able to temporarily buffer data that can not be written to the database, according to the Maximum Rows to Buffer Before Pausing Capture option above. Sometimes, the remote data source may be able to buffer data more safely, so ticking this option will immediately pause capture if the database becomes unavailable due to an error. Attempts are made to restart capture and re-open the database according to Delay Before Restart seconds on the General tab and when successful any buffered rows are written. This setting also effects how capture is started, normally data capture starts immediately while the database is still being opened with data temporarily cached and written once the database is available, unless this option is ticked. Beware this may cause some confusion when initially testing database capture, unless the errors in the information log are seen.
Escape Backslash (MySQL)
Ticking this option avoids a problem with old versions of MySQL that treat the backslash character as the first of an escape sequence (ie \f is form feed). This option sends \ as \\ so MySQL saves it as \ instead of reporting a syntax error. Newer versions of MySQL have a configuration option to disable escape sequences.
No Pause for Full Buffer (Ignore Data)
Ticking this option allows capture to log files to continue even if a database is unavailable, or if the capture rate is so fast that a database can not keep up. This works in conjunction with 'Maximum Rows to Buffer before Pausing Capture' so that once the limit is reached subsequent rows are ignored instead of being buffered, but are still written to the capture log file. This feature is primarily designed to support capture applications that regularly update the same information, such as global positioning satellite data where a vehicle position need not be recorded every second. The number of rows not written to the database is logged similarly to the following:
Database Rows Added: 3,990, Database Errors 16, Skipped 113
and also reported in the tray application in brackets after the number of DB rows. Note the minimum number of rows that may be buffered is 50, which is required for normal operation where 10 or more rows may be captured as a burst which may be faster than they can be written to SQL.
Ignore Records That Cause Error
Ticking this option prevents a row being buffered when a SQL error occurs and the database is closed and re-opened to try and clear the error. This is primarily intended to overcome syntax and duplicate key errors where the database can not write a specific row of data and will get stuck in a repeating loop trying to write the same row again and again. Unfortunately, due to the widely varying error responses from different SQL databases, this feature might cause a row to be lost if the network is lost or the SQL server simply stopped while a row is being written.
Save/Restore Buffered Rows to Disk
ComCap always buffers rows in memory that can not written to a database due to network errors, and updates the database as soon as it becomes available again. If this option is not used, buffered rows are lost forever if ComCap is exited before the database connection has been successfully restored. With this option, the buffered rows are saved to a file (in the same directory as the config files) when capture is stopped (but not paused) and restored to the buffer when capture is started again. The actual file name is reported in the info log file. Beware this may cause a problem if the database format is changed so the buffered rows are no longer valid, so just delete the file.
Recovery Functionality for Old Data
Database problems are unfortunately inevitable. The database server might get rebooted by Windows Update (despite all settings saying don’t reboot), network issues could break the connection, and many other reasons may cause captured data to fail to be written to the database. ComCap therefore provides a recovery feature Database from Log, accessed from the right click menu in the main window, which allows previously captured data to be added to the database, from an old Capture Log.
When clicked, a File Open dialog allows the capture log to be selected. A dialog then warns ‘Confirm Read Capture Log and Add X Rows to Database for (channel)?’ If OK is clicked, all lines in the Capture Log will be added to the database, using the settings for that channel. If the extra serial_nr column is used this will have a normal increment Serial Number, but the event_time column will reflect the time the row was added, not when it was captured. This is one reason why it’s better to add these extra columns to the capture log, so they can be imported accurately later. To avoid duplicate rows, it may be necessary to manually edit a copy of the capture log to remove any lines successfully added to the database.
This recovery feature can also be used for testing database Data Format settings, without needing to wait for new data to be captured.